| Handbrake adjustment on the Alfetta | |
| (This is an article found on the Internet a couple of years back - I have lost the name of the original author. I have made corrections to this file based on my own experiences) | |
| Tools for this procedure include: | |
|
|
| Procedure | |
| 1) With the transmission in neutral, carefully jack up the rear of the car and support the car on two jack stands so the rear wheels can move freely. | |
| Preliminary Handbrake Adjustment | |
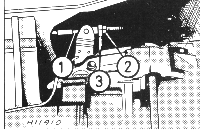 2)
Make sure that the handbrake cable isn't too tight. The cable runs through two
actuating levers, one on top of the left brake caliper and the other on top of
the right caliper. The cable is correctly adjusted if there is no tension
applied to the actuating levers and the cable is not excessively slack. Since
the handbrake cable will have to be checked again after the pad-to-rotor
clearances are set, for now just make sure the cable isn't too tight. Modify the
position of the adjusting nut (3) and locknut (2) to compensate if the cable is
too tight (see figure at right). 2)
Make sure that the handbrake cable isn't too tight. The cable runs through two
actuating levers, one on top of the left brake caliper and the other on top of
the right caliper. The cable is correctly adjusted if there is no tension
applied to the actuating levers and the cable is not excessively slack. Since
the handbrake cable will have to be checked again after the pad-to-rotor
clearances are set, for now just make sure the cable isn't too tight. Modify the
position of the adjusting nut (3) and locknut (2) to compensate if the cable is
too tight (see figure at right). |
|
Adjusting The Right Caliper Pad-to-Brake-Rotor Clearances |
|
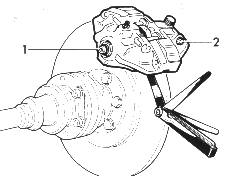
| 3) Working on the right caliper, remove the plastic dust cap with a 17 mm wrench (CCW). Then use the 17 mm wrench to loosen the locknut behind the dust cap (CCW). Turn it enough to loosen it, but no more (see figure at right). | |
 |
4)
Insert the 5 mm hex wrench into the socket-headed screw and turn it clockwise (CW)
to withdraw the outboard piston enough to insert the 0.01 mm feeler gauge
between the outboard pad and brake rotor. Then turn the 5mm hex wrench
counterclockwise (CCW) until the pad-to-rotor clearance is 0.01 mm. Leave the
feeler gauge in place while completing step 5. 5) Using the 7 mm socket, turn the adjusting screw clockwise (CW) to withdraw the inboard piston enough to insert the second 0.01 mm feeler gauge between the inboard pad and brake rotor. Then turn the screw counterclockwise (CCW) until the pad-to-rotor clearance is 0.01 mm. 6) Check that the clearance set in step 4 is
still 0.01 mm. If it's not, readjust it. If it is, insert the 5mm hex wrench
into the socket-headed screw and tighten the 17 mm locknut. The hex wrench is
used to prevent the screw from turning while tightening the locknut. |
| Adjusting the Left Caliper Pad-to-Brake-Rotor Clearances | |
| 7) Working on the left caliper, remove the
plastic dust cap with a 17 mm wrench (CCW). Then use the 17 mm wrench to loosen
the locknut behind the dust cap (CCW). Turn it enough to loosen it, but not
more. 8) Insert the 5 mm hex wrench into the socket-headed screw and turn it clockwise (CW) to withdraw the outboard piston enough to insert the 0.01 mm feeler gauge between the outboard pad and brake rotor. Then turn the 5 mm hex wrench counterclockwise (CCW) until the pad-to-rotor clearance is 0.01 mm. Leave the feeler gauge in place while completing step 9. 9) Using the 7 mm socket, turn the adjusting screw counterclockwise (CCW) to withdraw the inboard piston enough to insert the second 0.01 mm feeler gauge between the inboard pad and brake rotor. Then turn the screw clockwise (CW) until the pad-to-rotor clearance is 0.01 mm. 10) Check that the clearance set in step 8 is still 0.01 mm. If it's not, readjust it. If it is, insert the 5 mm hex wrench into the socket-headed screw and tighten the 17 mm locknut. The hex wrench is used to prevent the screw from turning while tightening the locknut. 11) Carefully replace the plastic dust caps
using the 17 mm wrench. |
|
| Final Handbrake Adjustment | |
| 12) Recheck the handbrake cable adjustment. The
cable is correctly adjusted if there is no tension applied to the actuating
levers and the cable is not excessively slack. Modify the position of the
adjusting nut and locknut to compensate for a cable that is too tight or too
loose. 13) Go park on a hill or test the hand brake on a loose gravel road, to see if both rear wheels brake evenly. |
|
| Back to DIY | |